There’s nothing worse than taking mince out of the freezer for a meal you want to start preparing in like 10 minutes, only to find that the

So, what is the best way to store mince? Nobody likes leaving it out on the kitchen bench to defrost, and even when you put it in the fridge to slowly defrost it seems like it takes forever – plus – we all know that
I had a good think about it, and here are my best tips for buying and freezing mince:
- I always buy in bulk and always when its on special.
- Check the use by dates if the mince is pre-packaged
- Divide it up – for 3 adult size meals (man-sized!) we portion it into 250g lots – this is enough for spaghetti, nachos, etc for all of us and there’s usually some left over
- Get a vacuum sealer machine – if you don’t want to go to the expense (it’s worth it!) then there is a trick you can use with an iron (but hey, who enjoys ironing right??). If you want the easiest option – go the zip lock freezer bags.
- Place your mince portions into your storage choice. Using a rolling pin (or large glass) roll the mince out to about 2-3mm thick, spreading the mince into the corners of the bag to eliminate the air.
- Seal the bag.
- Freeze! Make sure that it’s stored flat in the freezer! This will save you space. If you are using just freezer bags, place some paper towel or newspaper between each layer of mince to stop it all sticking together – this only seems to happen with the thinner plastic bags.
- To defrost, either take out a few hours before you need it and defrost in the fridge; or if you are in a hurry, put the frozen mince (still inside the bag) in the sink with some cold (NOT hot) water while you prep the rest of your meal.
As I said earlier, mince is one of those foods where safe food handling is really important. Do NOT refreeze raw mince – for example, don’t freeze your mince, then decide to make sausage rolls and then freeze your uncooked sausage rolls. You can defrost your mince, and then cook it in say spaghetti sauce, and then freeze the sauce again without a problem.

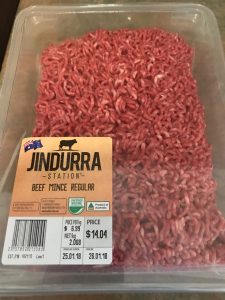
Buy in bulk 
Roll out your portion 
Extract all air 
Ready to freeze
Bouquet Garni (how to bunch herbs)
Bouquet Garni – its the fancy way to say “I got a bunch of herbs tied together!”

Using a bouquet garni in your slow cooked meals is gold, but if your family is anything like ours, they don’t like digging through their slow cooked meat looking for herbs on the loose.
Here’s how to make your own at home – it’s so easy, you will wonder why you didn’t think of it earlier!
You’ll need to get some fresh herbs – either from your garden, your neighbour’s garden, or the local supermarket.

In the dish that we are preparing here, beef brisket, we used sliced onions in the pot – keep one of the onion layers for the bouquet garni.

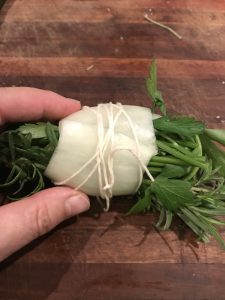
Wash your herbs and gather them into a bunch, carefully place the hard end of the herbs inside the onion skin.

Then bend the herbs back over themselves so that they fit inside the onion skin.
Get some cooking twine, and firmly wrap the herbs so that they are encased inside the onion skin.
That’s it! Ready to use.

Tip: when you finish cooking your meat, the bouquet garni can easily be removed from the juices.
Homemade Breadcrumbs – Don’t Throw Out Your Leftover Bread!
Years ago I gave up on the store bought breadcrumbs – they were too dry, bland, and I had no idea where they really came from – so I started making my own homemade breadcrumbs and I’ve never looked back.
Ok, so we have all bought breadcrumbs which come out of either a cardboard box or a plastic bag…but what about homemade breadcrumbs? Do you look at all that left over bread in the freezer and chuck most of it out? It’s time to make your own breadcrumbs, and here’s how I do it…
First of all, gather all those scrappy bits of bread out of the freezer (you had no idea there were so many bags in there did you??) including all the ends and broken bits. Take a look on the bench – is there any old bread there that you can use (not if its growing things though!). Hang onto a couple of the plastic bags, you will need them in a minute!

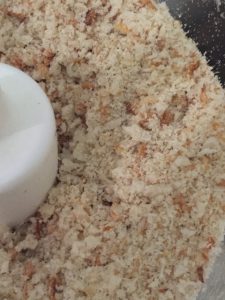
Cut or break the bread up into smaller chunks, and put them into the food processor and process until fine.

Put them back into the plastic bag and tie them off – when you put them into the freezer, try and spread the crumbs out throughout the bag so that they aren’t in a huge clump (makes it hard to use later).
What can I use them for?
- Chicken Schnitzel
- Sausage Rolls
- Rissoles
- Meatloaf
Shortcrust Pastry – Easy to Make and Better than Frozen ~ Everyday!
Making your own shortcrust pastry is so easy, you will wonder why you ever spent the extra dollars on the store bought variety. Use this recipe for either sweet or savoury dishes and create a simple, yet short (that’s where you get that crisp base from) pastry.
Yum, who doesn’t love a lovely tart with a really lovely shortcrust pastry base? This can be used for quiche, sweet tarts, savoury tarts – it’s simple and delicious.
This recipe is made in the food processor – if you do not have a food processor, you can still make it by hand – work quickly and only use the tips of your fingers when getting the mix to “breadcrumb” stage (if you use your palms the mix will heat up).
Ingredients:
- 1 3/4 cup plain flour
- 125g chilled butter (roughly chopped)
- 1 egg yolk, lightly whisked
- 2 teaspoons iced water
Put the flour and butter into the processor – process until it looks like fine breadcrumbs.
 Add egg yolk and water and process until dough just starts to come together (note – add more water if required).

You are aiming for a soft, smooth dough.

You will need to blind bake the pastry.
Blind Bake Pastry – Step by Instructions Made Easy
The trick to a good base is to blind bake pastry. By doing this, you are setting the foundations for a really good, short, crisp base instead of a soggy mess.
A blind bake pastry is really easy to make. The idea is so that you can keep a fairly thin crust without it bubbling up before you put the filling in.
Once you have made your pastry, follow these steps.
Roll out onto a lightly floured surface – roll out to the size of the tray you intend to use for the tart. Line the tray with baking paper, then place into tray and trim to fit.
Refrigerate for at least half an hour to let the pastry rest. This will let the gluten relax and stop shrinkage.
The next step is to place grease-proof paper over the pastry, and cover with either baking beads or uncooked rice to weigh the pastry down and to stop it bubbling up.

Bake 180ºc for about 15 minutes to set the pastry.

Then remove the weights and put tray back into the oven, cook until slightly golden.
Remove from oven.


Carefully inspect your pastry – if it has cracks like mine does, the liquid will leak into the tray when you add the filling. You need to make a “putty” to fill the cracks and seal the pastry.
To make the putty, mix some flour and water together to form a paste.

Then spread a film of paste over the baked pastry, making sure you fill any cracks.

Then, back into the oven to cook off the base again.
You will see that the “putty” will be firm when ready.

Once your tart base is ready, you can then continue on with the recipe and fill as per the recipe instructions.


